Auto Scaling Group Behind an ALB — Elastic Compute That Scales Itself
Days 1 through 6 have built individual components — a server, a CDN, a network, an API, a database, an IAM framework. Today they come together into something that behaves like real production infrastructure: a system that watches its own load and responds to it.
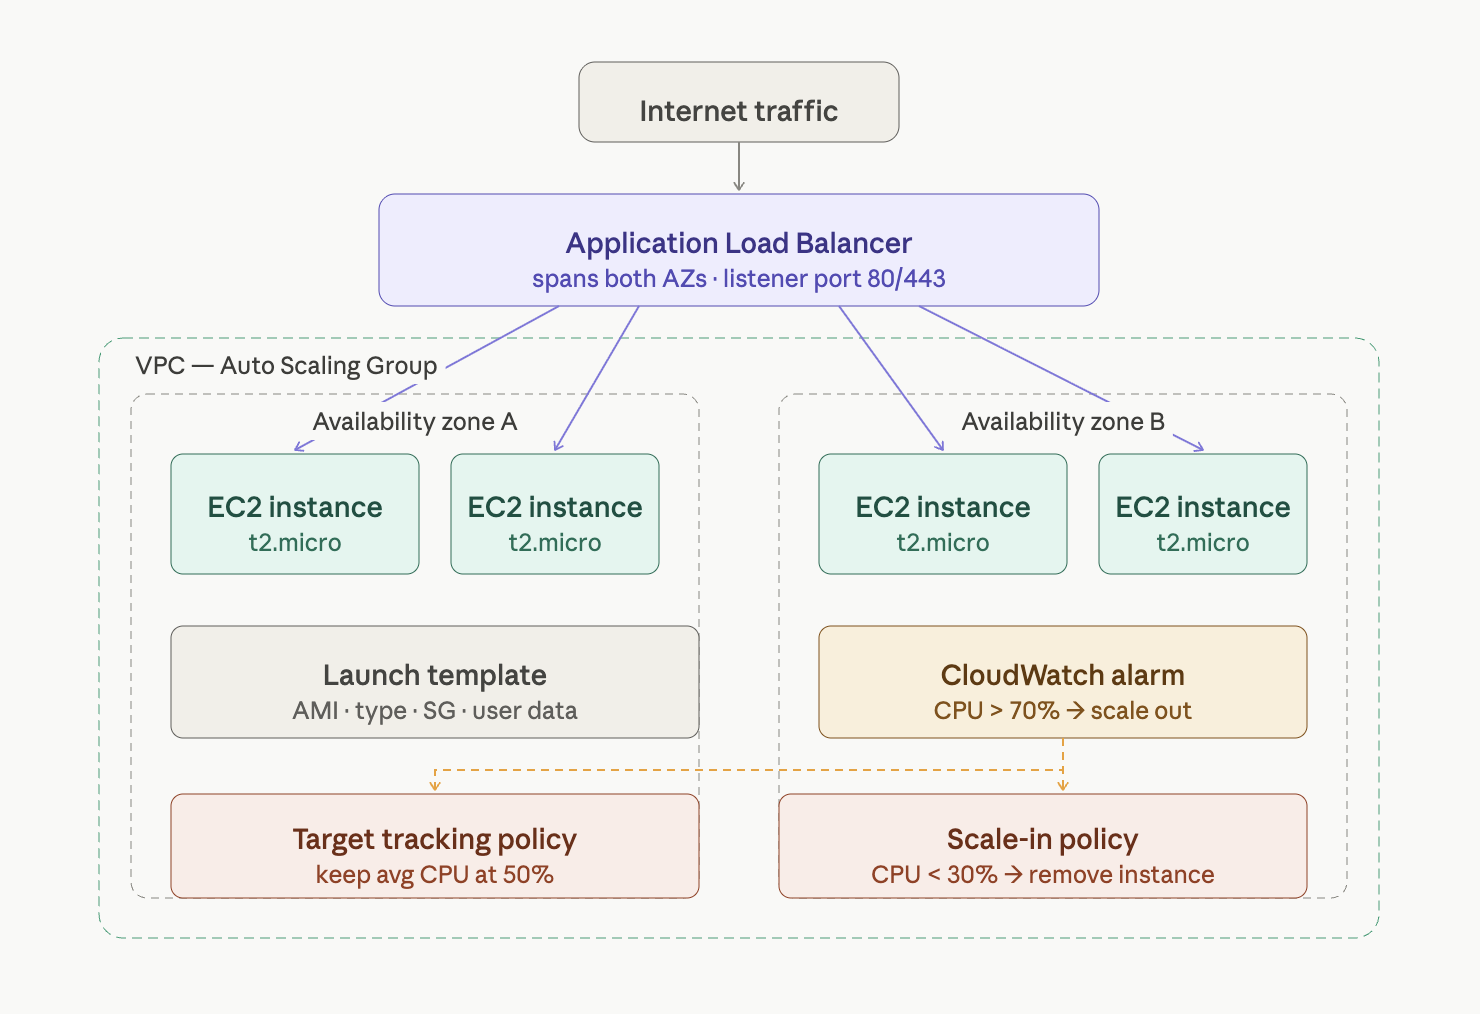
Day 7: an Application Load Balancer distributing traffic across an Auto Scaling Group that spans two Availability Zones. When CPU climbs, it adds instances. When CPU drops, it removes them. When an instance dies, it replaces it. All automatically. No human required.
This is horizontal scaling — and it's one of the defining architectural patterns of AWS.
Architecture overview
Every component has a specific job. The launch template defines what instances look like. The ASG decides how many to run and where. The target group tracks which ones are healthy. The ALB routes traffic only to healthy instances. CloudWatch alarms drive the scaling decisions.
The user data script that makes it interesting
Each instance runs this script at boot. It fetches its own instance ID and AZ from the metadata service and writes them to the web page:
#!/bin/bash
yum update -y
yum install -y httpd
systemctl start httpd
systemctl enable httpd
TOKEN=$(curl -s -X PUT "http://169.254.169.254/latest/api/token" \
  -H "X-aws-ec2-metadata-token-ttl-seconds: 21600")
INSTANCE_ID=$(curl -s -H "X-aws-ec2-metadata-token: $TOKEN" \
  http://169.254.169.254/latest/meta-data/instance-id)
AZ=$(curl -s -H "X-aws-ec2-metadata-token: $TOKEN" \
  http://169.254.169.254/latest/meta-data/placement/availability-zone)
echo "<h1>Day 7 — ASG + ALB</h1>
<p>Instance: $INSTANCE_ID</p>
<p>AZ: $AZ</p>" > /var/www/html/index.html
When you refresh the ALB URL repeatedly, you see the instance ID and AZ change. That's the load balancer distributing your requests across instances in both availability zones. Real horizontal scaling, visible in your browser.
Step-by-step build
Step 1 — Create the launch template
Go to EC2 → Launch Templates → Create launch template:
- Name:
day7-web-template - AMI: Amazon Linux 2023
- Instance type:
t2.micro - Security group:
day7-instance-sg(HTTP from ALB SG only, SSH from your IP) - User data: paste the script above
The launch template is the blueprint. Every instance the ASG creates is an exact copy of this specification.
Step 2 — Create security groups (two of them)
ALB security group (day7-alb-sg):
- Inbound: HTTP 80 from
0.0.0.0/0, HTTPS 443 from0.0.0.0/0
Instance security group (day7-instance-sg):
- Inbound: HTTP 80 from
day7-alb-sgonly
This is the correct pattern. Instances are not publicly accessible — only the ALB can reach them on port 80. Direct access to instances from the internet is blocked.
Step 3 — Create the target group
Go to EC2 → Target Groups → Create target group:
- Target type: Instances
- Name:
day7-target-group - Protocol: HTTP, Port 80
- Health check path:
/ - Healthy threshold: 2 checks
- Unhealthy threshold: 2 checks
Don't register targets manually. The ASG does this automatically when it launches instances.
Step 4 — Create the ALB
Go to EC2 → Load Balancers → Create → Application Load Balancer:
- Name:
day7-alb - Scheme: Internet-facing
- Subnets: select the public subnet from each AZ
- Security group:
day7-alb-sg - Listener: HTTP 80 → forward to
day7-target-group
Step 5 — Create the Auto Scaling Group
Go to EC2 → Auto Scaling Groups → Create:
- Launch template:
day7-web-template - Network: private subnets from both AZs
- Load balancing: attach to
day7-target-group - Health checks: enable ELB health checks
- Capacity: Min 1 · Desired 2 · Max 4
- Scaling policy: Target tracking → Average CPU Utilization → 50%
Click Create. Two instances launch within ~2 minutes.
Step 6 — Verify with the browser
Copy the ALB DNS name from the console. Open it in your browser:
http://day7-alb-XXXXXXXXXX.us-east-1.elb.amazonaws.com
Refresh 10 times. Watch the instance ID and AZ change. That's cross-AZ load balancing working in real time.
Go to Target Groups → day7-target-group → Targets. Both instances should show Healthy.
Step 7 — Trigger a scale-out
SSH into one of the instances and stress the CPU:
sudo yum install -y stress
stress --cpu 4 --timeout 300
Watch CloudWatch → Alarms — within 2–3 minutes the CPU alarm enters "In alarm" state. Then watch ASG → Activity tab — a third instance launches automatically. Stop the stress test and the extra instance terminates within 5–10 minutes.
Step 8 — Test self-healing
Go to EC2 → Instances → terminate one of the ASG instances. Watch the ASG Activity tab — within 2 minutes it launches a replacement. The ASG always maintains desired capacity.
Step 9 — Clean up
1. Delete the Auto Scaling Group  (terminates instances automatically)
2. Delete the Application Load Balancer
3. Delete the target group
4. Delete the launch template
5. Delete both security groups
Always delete the ASG first. If you delete the ALB first, the ASG tries to re-register instances and errors.