IAM Roles, Policies & Least Privilege Audit on AWS
Every project so far has involved creating AWS resources — EC2 instances, S3 buckets, Lambda functions, RDS databases. But behind every one of those resources is a question I hadn't fully answered yet: who is allowed to do what, and how does AWS decide?
This is the project I wish I had done on Day 1. Because IAM isn't just a security topic — it's the foundation that every other AWS service is built on.
Why IAM matters more than any other service
Every action in AWS is an API call. Launching an EC2 instance, uploading to S3, reading from DynamoDB — all API calls. IAM decides, for every single one of those calls, whether the identity making it is allowed to proceed.
Get IAM wrong and you get:
- Developers with more access than they need (blast radius when credentials leak)
- Applications using long-term access keys hardcoded in code (credential exposure)
- Root account used for daily work (catastrophic if compromised)
- No audit trail of who has access to what
Get IAM right and you get defence in depth — even if one part of your system is compromised, the attacker can only do exactly what that identity was allowed to do. Nothing more.
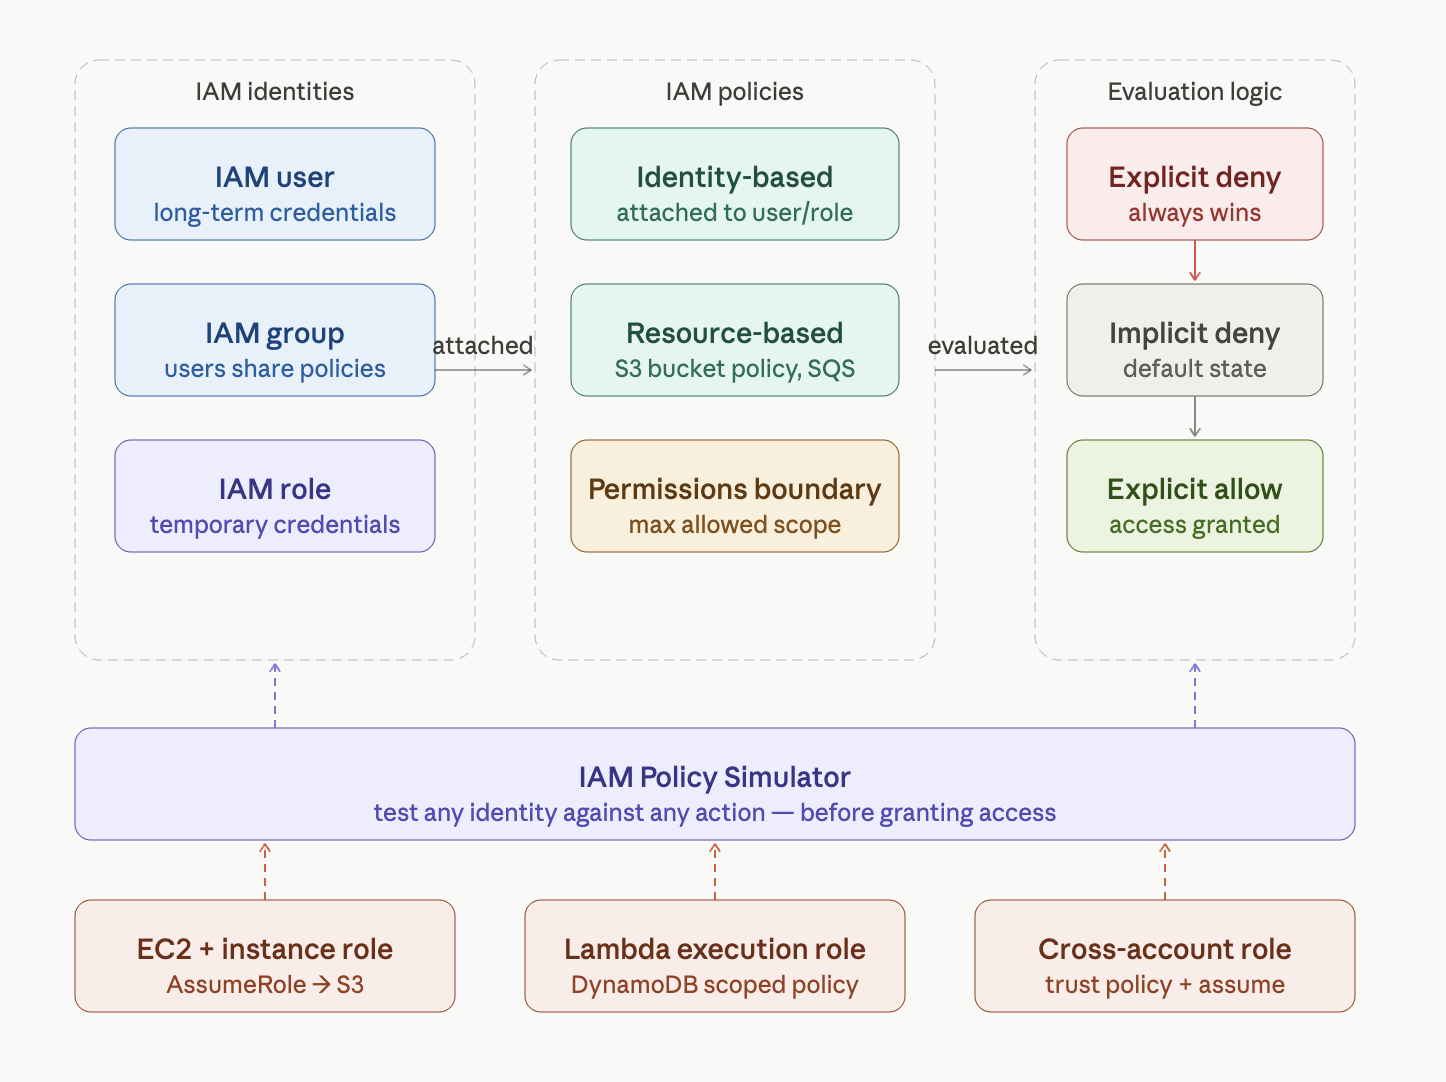
The policy evaluation order — the most important IAM concept
Before the steps, burn this into memory. Every time AWS receives an API request, it evaluates attached policies in this exact order:
1. Explicit DENY   ← if any policy says Deny, request is rejected immediately
       │
       ▼ (no explicit deny found)
2. Explicit ALLOW  ← if any policy says Allow, request is granted
       │
       ▼ (no explicit allow found)
3. Implicit DENY   ← default state — everything not allowed is denied
The critical rule: an explicit Deny always wins. Even if a user has AdministratorAccess, a single "Effect": "Deny" statement in any attached policy will block that action. Every time. No exceptions.
And the default state is denial — AWS doesn't grant access unless a policy explicitly says so.
Step-by-step build
Step 1 — Enable MFA on the root account
This is mandatory before anything else. The root account has unlimited power over your AWS account and cannot be restricted by any IAM policy. It can delete everything, cancel the account, and override any permission.
Go to: account name (top right) → Security credentials → Multi-factor authentication → Assign MFA → Authenticator app → scan with Google Authenticator or Authy.
After this, never use the root account for daily work again.
Step 2 — Create an admin IAM user for yourself
Go to IAM → Users → Create user:
- Username:
your-name-admin - Console access: yes, custom password
- Permissions: attach
AdministratorAccessdirectly - Download the sign-in URL and credentials CSV
From this point forward, use this IAM user — not root — for all AWS work.
Step 3 — Create a developer group with scoped permissions
Go to IAM → User groups → Create group → developers
Create a custom policy (IAM → Policies → Create policy → JSON):
{
  "Version": "2012-10-17",
  "Statement": [
    {
      "Sid": "AllowEC2ReadOnly",
      "Effect": "Allow",
      "Action": ["ec2:Describe*", "ec2:Get*"],
      "Resource": "*"
    },
    {
      "Sid": "AllowS3Limited",
      "Effect": "Allow",
      "Action": ["s3:GetObject", "s3:PutObject", "s3:ListBucket"],
      "Resource": [
        "arn:aws:s3:::your-bucket-name",
        "arn:aws:s3:::your-bucket-name/*"
      ]
    },
    {
      "Sid": "DenyBillingAccess",
      "Effect": "Deny",
      "Action": "aws-portal:*",
      "Resource": "*"
    }
  ]
}
Name it DeveloperPolicy. Attach it to the developers group.
Notice the explicit Deny on billing. Even if someone later attaches a broader policy to a developer, they still cannot access billing. The deny wins.
Step 4 — Create a test developer user
IAM → Users → Create user → dev-tester
- Add to group:
developers - No direct policy attachments — all permissions come from the group only
This is the correct pattern. Manage permissions at the group level; users inherit them.
Step 5 — Create an IAM role for EC2
This is how EC2 instances should access AWS services — via a role, never via hardcoded access keys.
IAM → Roles → Create role:
- Trusted entity: AWS service → EC2
- Inline policy (JSON):
{
  "Version": "2012-10-17",
  "Statement": [
    {
      "Effect": "Allow",
      "Action": ["s3:GetObject", "s3:ListBucket"],
      "Resource": [
        "arn:aws:s3:::your-bucket-name",
        "arn:aws:s3:::your-bucket-name/*"
      ]
    },
    {
      "Effect": "Allow",
      "Action": [
        "logs:CreateLogGroup",
        "logs:CreateLogStream",
        "logs:PutLogEvents"
      ],
      "Resource": "arn:aws:logs:*:*:*"
    }
  ]
}- Role name:
EC2-S3ReadOnly-Role
This role lets an EC2 instance read from S3 and write to CloudWatch Logs — nothing else. The EC2 instance assumes this role automatically via its instance profile and receives temporary credentials that rotate every hour.
Step 6 — Run the Policy Simulator audit
Go to: https://policysim.aws.amazon.com
Or: IAM → Users → select dev-tester → Simulate policy (right panel).
Every test confirms least privilege is working. The developer can read S3 but can't delete. The EC2 role can read S3 but can't touch DynamoDB.
Step 7 — Download the credential report
IAM → Reports → Credential report → Download
This CSV lists every IAM user, their MFA status, last login, and access key age. In a real security audit, this is the first thing you review.
Look for:
mfa_active = false→ MFA not enabled (risk)password_last_used = never→ unused account (should be disabled)- Access keys older than 90 days → should be rotated
Step 8 — Clean up
Delete: dev-tester user
Delete: developers group
Delete: DeveloperPolicy
Delete: EC2-S3ReadOnly-Role
Keep:   your-name-admin  (use for all future projects)