Build a Production-Grade VPC with Public & Private Subnets
Every EC2 instance, every RDS database, every Lambda in a VPC, every load balancer — they all live somewhere inside a Virtual Private Cloud. Understanding the VPC is understanding the foundation that everything else in AWS is built on.
This is Day 3 of my #30DaysOfAWS challenge, and today I built a production-grade VPC from scratch — two availability zones, public and private subnets, an internet gateway, a NAT gateway, and route tables wired up correctly.
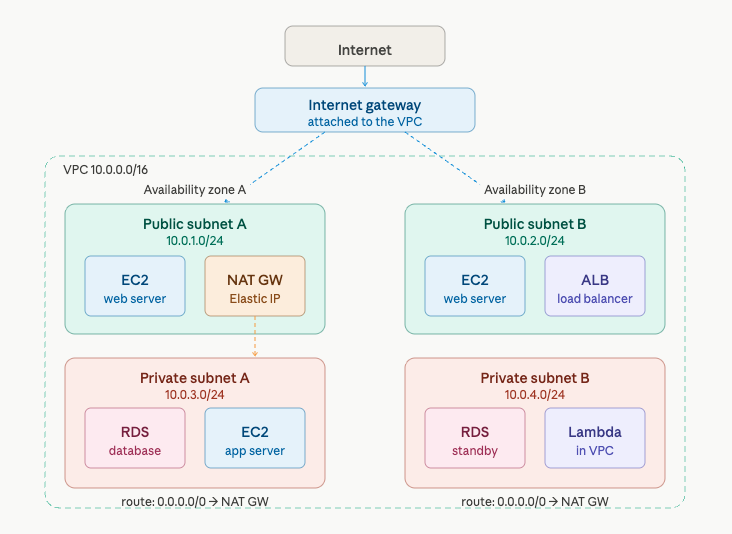
Architecture overview
The most important thing in this diagram isn't what's in each subnet — it's the route tables on the right side. That's literally what separates a public subnet from a private one.
The single most important concept
Before the steps, burn this into your memory:
A subnet is "public" or "private" purely because of its route table. Nothing else.
A public subnet has a route: 0.0.0.0/0 → Internet Gateway. Traffic to anywhere on the internet flows out through the IGW, and inbound internet traffic can reach resources inside.
A private subnet has a route: 0.0.0.0/0 → NAT Gateway. Resources inside can initiate outbound connections (for software updates, API calls), but nothing from the internet can initiate a connection inward.
Change the route table entry and you change whether the subnet is public or private. The word "public" or "private" in the subnet's name means absolutely nothing to AWS.
Step-by-step build
Step 1 — Create the VPC
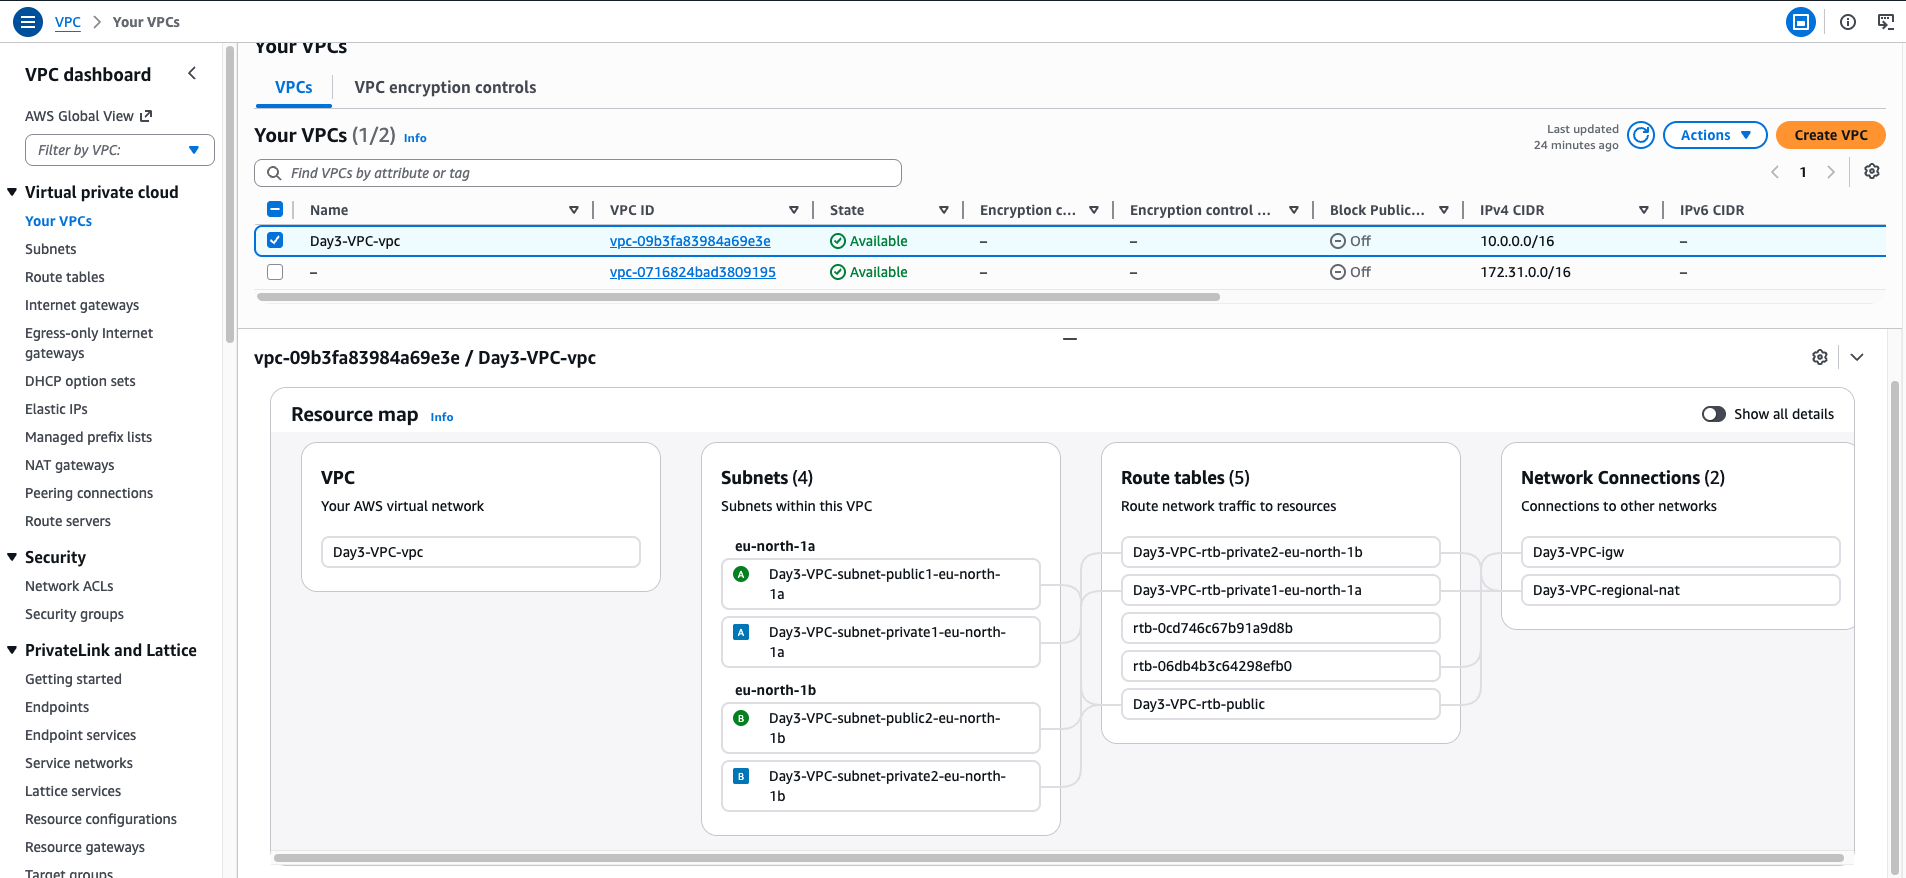
Go to VPC → Your VPCs → Create VPC and select "VPC and more" (the guided wizard):
- Name:
day3-vpc - IPv4 CIDR:
10.0.0.0/16 - Availability zones: 2
- Public subnets: 2
- Private subnets: 2
- NAT gateways: 1 in 1 AZ (enough for learning — production uses one per AZ)
- VPC endpoints: None
Click Create. AWS builds everything at once: the VPC, 4 subnets, 3 route tables, the IGW, and a NAT Gateway with an Elastic IP.
💡 The wizard is the fastest path. But know how to build each piece manually too — the exam tests individual components, not wizard flows.
Step 2 — Enable auto-assign public IPs on public subnets
Go to VPC → Subnets. For each of the two public subnets:
Actions → Edit subnet settings → Enable auto-assign public IPv4 address → Save
Without this, EC2 instances launched in the public subnet won't automatically get a public IP — you'd have to manually assign one every time.
Step 3 — Verify the route tables
This is the most important step. Go to VPC → Route Tables and check each one.
Public route table (associated with both public subnets):
Private route table (associated with both private subnets):
Confirm each subnet is associated with the correct route table under the Subnet associations tab.
Step 4 — Launch a public EC2 instance
Go to EC2 → Launch instance:
- Name:
day3-public-test - AMI: Amazon Linux 2023,
t2.micro - VPC:
day3-vpc - Subnet: select a public subnet
- Auto-assign public IP: Enable
- Security group: allow SSH from your IP, allow ICMP from
10.0.0.0/16
Note that after launch it receives both a private IP and a public IP automatically.
Step 5 — Launch a private EC2 instance
Launch a second instance:
- Name:
day3-private-test - Same VPC, select a private subnet
- Auto-assign public IP: Disable
- Security group: allow SSH from
10.0.0.0/16only
This instance gets only a private IP — no route from the internet can reach it directly.
Step 6 — Test connectivity
SSH into the public instance:
ssh -i day3-key.pem ec2-user@<public-ip>Ping the private instance from inside the public instance to confirm VPC-internal routing works:
ping <private-instance-private-ip>
# Works — same VPC, ICMP allowed in the security group
From the private instance (accessed via the public instance as a bastion), confirm outbound internet access via the NAT Gateway:
curl https://checkip.amazonaws.com
# Returns the NAT Gateway's Elastic IP
# Proves outbound works — but nothing can initiate inbound
Step 7 — Clean up (order matters)
1. Terminate both EC2 instances
2. Delete the NAT Gateway  (takes ~1 min)
3. Release the Elastic IP  (charged when unattached)
4. Delete the VPC          (cascades — removes subnets, route tables, IGW)
⚠️ NAT Gateways cost ~$0.045/hour. Always delete them after learning projects — they are the most common source of unexpected AWS bills for beginners.